Debido a la inactividad, tu sesión finalizará en aproximadamente 2 minutos. Prolonga tu sesión haciendo clic en "Aceptar" a continuación.

Tu sesión ha terminado debido a inactividad. Vuelve a ingresar para continuar.

Guía del usuario para la integración de la aplicación de negocios One Talk Side View

    What is One Talk Side View?

    One Talk Side View permite que ciertas aplicaciones para negocios de terceros funcionen con facilidad con aplicaciones móviles y de escritorio de One Talk.

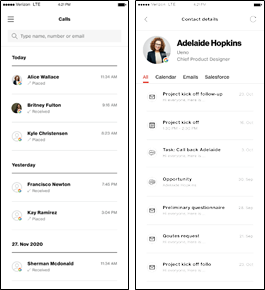
    La integración con Side View optimiza One Talk al brindar un resumen de detalles importantes sobre los contactos mientras estás en una llamada, lo cual le ahorra tiempo al empleado y mejora la productividad. Las aplicaciones móviles y de escritorio muestran correos electrónicos recientes, reuniones anteriores y futuras e información de una cuenta CRM para un contacto, para que las interacciones de tus clientes sean más productivas.

    • Las "aplicaciones auxiliares" de One Talk muestran información disponible sobre los contactos de llamadas entrantes y salientes
    • Correos electrónicos recientes, reuniones anteriores y futuras, detalles de cuenta CRM
    • El usuario de One Talk puede registrar llamadas, tareas y eventos, sincronizaciones automáticas con la cuenta de CRM

    Side View Activation and Integration

    • How do I activate One Talk Side View? One Talk Side View will automatically detect your One Talk number and will use it for activation. After installing Side View, follow the activation screens to request a PIN, enter it when prompted, and then setup your profile by signing in with at least one business app.
    • Can I connect multiple business apps to One Talk Side View at the same time? Yes. You can connect one Office Suite app and one CRM app at the same time. However, you can't connect multiple Office Suite apps or multiple CRM apps at the same time.
    • Can I use One Talk Side View if I haven't connected any business apps? No. You must connect at least one business app to use One Talk Side View.
    • Is One Talk Side View supported on Hunt Group, Auto Receptionist and Call Queue lines? No. One Talk Side View is not supported on Hunt Group, Auto Receptionist and Call Queue lines, but is supported on user lines that are members of Hunt Groups, Auto Receptionist lines, and Call Queues.
    Who is One Talk Side View ideal for?

    One Talk Side View is a helpful application for employees with a customer facing role, such as sales people and support technicians. Users who require immediate access to contact profile information delivered at a glance during their customer interactions will find benefits from using One Talk Side View.

    The solution enables smarter workflows and better productivity by eliminating the need to hunt and peck through multiple business apps to retrieve important contact details, when you need to stay focused on your call. One Talk Side View helps your sales and support teams foster better relationships in an effort to drive more sales and elevate the customer experience.

    How does One Talk Side View work?

    At a high-level, One Talk Side View syncs contact details from your Office Suite and CRM apps, so that on inbound and outbound calls you will see contact profile information natively displayed, as well as have the ability to add new activities. You can log your calls, enter tasks and create events, all from inside One Talk Side View, without having to toggle back and forth between apps. Adding new activities or editing existing ones will automatically sync the changes back to the CRM.

    Office Suite integration will display the following:

    • Contact profile information for each inbound and outbound call
    • Recent emails sent between you and the contact, including Subject, Body and Attachments
    • Past and upcoming meeting events where you and the contact are attendees

    CRM integration will display the following:

    • Leads created with the contact's number and email address
    • Opportunities associated with the contact
    • Cases linked with the contact
    • Activity history for each Lead, Opportunity and Case

    From inside One Talk Side View, you can add new activities (which automatically saves to the CRM):

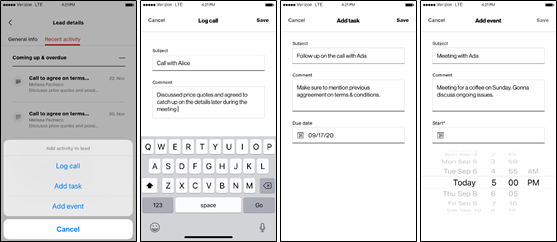
    • Log calls with a comment
    • Enter a task that's automatically assigned to yourself to follow up on
    • Create an event with a start and end date

    How does One Talk Side View integrate with your Business apps?

    One Talk Side View works by integrating with your business apps to retrieve information from those apps during calls. Your company must subscribe to at least one of the following business apps, and you will need to sign into your business app accounts through One Talk Side View to authorize access.

    Business Integration
    Required Editions
    Espacio de trabajo de Google
    Google Workspace business plans
    Microsoft 365
    Personal or business plans
    Salesforce Enterprise, Unlimited, Performance or Developer
    Sugar CRM
    Sugar CRM version 7 and up
    Microsoft Dynamics 365 Microsoft Dynamics 365 version 9 and up
    HubSpot CRM All editions
    ZoHo CRM All editions (Cases object not supported in free and standard editions.)

    Notas:

    1. Administrators (or account owners) must allow third-party logins to the business apps.
    2. Personal Gmail accounts are not supported by the Google Workspace integration.
    3. Salesforce, Sugar CRM and Microsoft Dynamics 365 require purchasing the One Talk premium integrations feature to use those integrations. Please reach out to your company's One Talk administrator for additional information.

    One Talk Requirements

    One Talk Side View works in conjunction with the One Talk apps and calling service (see Side View & One Talk Compatibility), and requires an active One Talk phone number. Reach out to your company's One Talk administrator to obtain a One Talk number and information on how to download and setup the One Talk app.

    Versiones de aplicación One Talk mínimas requeridas:

    • Android – 9.1.5
    • iOS – 6.1.4
    • Windows – 2.2.01
    • Mac – 2.2.0.1

    Side View & One Talk Compatibility

    Vista lateral Device Configuration Mobile app (App Calling) Mobile app (Call-Through) Basic Dialer Desktop app
    Android1 Completo Completo Completo No disponible
    iOS2 Completo Parcial Parcial No disponible
    Windows3 No disponible No disponible No disponible Completo
    Mac3 No disponible No disponible No disponible Completo
    1. Side View app (for Android) requires either a One Talk basic dialer device or a device with the One Talk mobile app.
    2. Side View app (for iOS) can run on devices with or without the One Talk app. However, full functionality is only available when the One Talk mobile app is active and it's set to app calling mode.

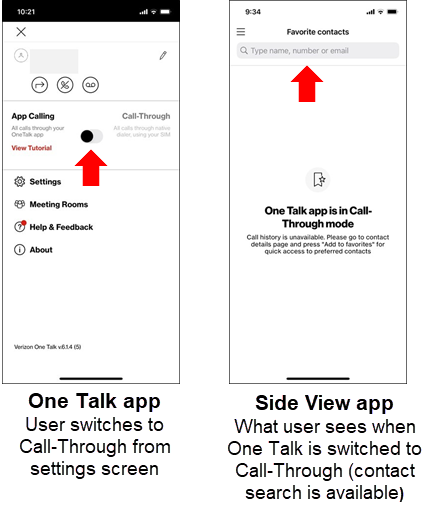
      Side View can run on iOS devices with the One Talk app that are set to call-through mode, and on devices without the One Talk app (e.g., One Talk basic dialer devices), however, functionality will be limited to contact search only. This means that Side View will not receive notifications (or call logs) for the user's One Talk number on incoming and outgoing calls, however, users can search their contacts (and mark contacts as favorites) at any time to retrieve contact history information.

      All functionality pertaining to the business integrations is available. For example, user will see the following when the One Talk app is set to call-through mode.

    3. Side View apps (for Windows and Mac) require a device with the One Talk desktop app.

    Installing One Talk Side View

    • Mobile App - Android and iOS
      Apps can be downloaded from Apple App Store and Google Play. Search "Verizon One Talk Side View."
    • Desktop App - Windows and Mac
      Apps can be downloaded from the One Talk Side View App download page.

    Activating One Talk Side View

    One Talk Side View funciona junto con la aplicación One Talk en tu dispositivo. Please install and activate the One Talk app with your One Talk phone number prior to signing into One Talk Side View. Reach out to your company's One Talk administrator to obtain a One Talk phone number.

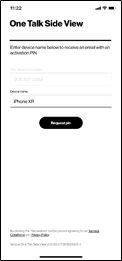
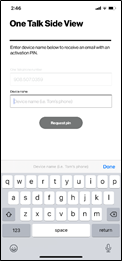
    1. Once installed, open One Talk Side View.

    2. Your One Talk number will be displayed in the "One Talk phone number" field.
    3. Enter a name for your device in the "Device name" field.

    4. Click Request pin.
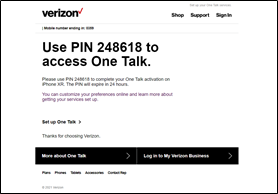
    5. Chequea tu correo electrónico para obtener tu PIN de activación. Your company's One Talk administrator must add your email address to your line account in the One Talk portal (My Business) in order for you to receive activation pin requests.

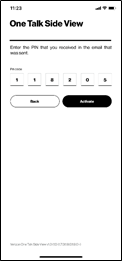
    6. Enter the activation pin and click Activate.

    7. You've successfully activated One Talk Side View. You can now proceed to profile setup.

    Setting up your profile

    Once One Talk Side View is activated, you will need to set up your profile before using business integrations on your device.

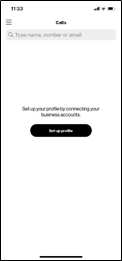
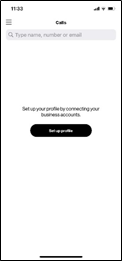
    1. From the main calls screen, select Set up profile.

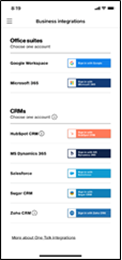
    2. One Talk Side View business integrations that your administrator has authorized you to access will be displayed on the following screen. Please reach out to your company's One Talk administrator for more information.

    3. One Talk Side View must be given permission to access information in your business app accounts. Click Connect next to the business app to sign in. Please note, you can only sign into one Office suite app and one CRM app at a time.
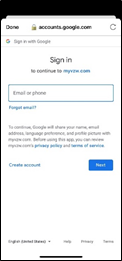
    4. Sign into the selected app by entering your credentials when prompted.

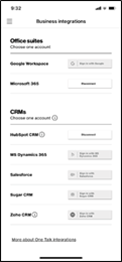
    5. Your profile has been set up. You can access this screen at any time through the settings menu to manage your integrations.

    Notas:

    1. Microsoft Dynamics 365 and Sugar CRM require a login URL to be entered on the sign in screen. Login URLs are specific to your company. Please reach out to your Microsoft Dynamics 365 or Sugar CRM administrator to obtain your company's login URL to enter.
    2. Sugar CRM may require entering additional app specific credentials. These credentials may be required by your company for added security. Please reach out to your Sugar CRM administrator to obtain your company's app specific credentials to enter.

    Menú de configuración

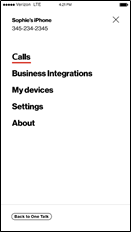
    From the settings menu, you can access your call history, business integrations, my devices, and settings to help you manage the app.

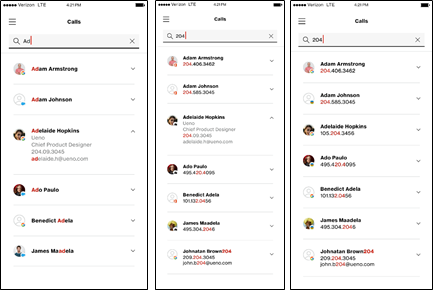
    Calls – Shows the history of your most recent calls.

    Business Integrations – Allows you to manage (connect / disconnect) One Talk Side View from your business apps.

    My Devices – Deactivate (sign out) a device you no longer wish to use with One Talk Side View.

    Settings – Enable / disable call notifications, select default contact source to show in the call history and share logs.

    Call Experience (Inbound / Outbound calls)

    To provide "context" during a call, One Talk Side View will automatically search for contact information in your connected business app accounts during an incoming or outgoing call, and display the search results in the app.

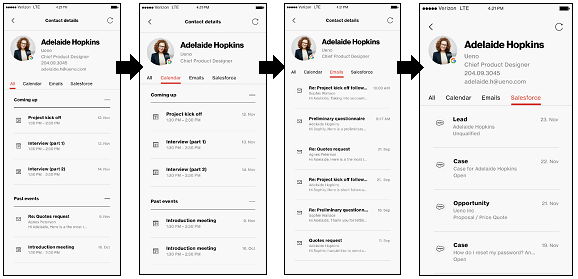
    Search results will include recent emails, calendar events and CRM information about the contact, and will be organized by "Coming up" and "Past events." Tabs at the top of the contact detail screen allow you to filter the search results by category, such as "Calendar," "Email," or "CRM" (e.g., "Salesforce"), to show the results in just that category.

    Viewing Calendar and Email

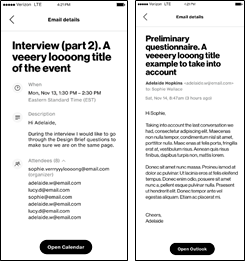
    From the contact details, screen, you can select any calendar event or email from the search results to reveal its details.

    Calendar details include the time/date of the event, description, and attendees.

    Email details include the subject, body, and attachments. Attachments can be downloaded to your device to view them later.

    "Open..." allows you to look up the full calendar event and email in the corresponding Office Suite app. Requires the app to be installed on the device and signed in.

    Accessing Opportunities, Leads and Cases

    From the CRM tab on the contact detail screen, you can select any CRM object (e.g., Opportunity, Lead and Case), then select the "General info" tab.

    Details displayed include a summary of the fields in the CRM for the selected object. You can look up the full details of the object in the corresponding CRM app (requires the app to be installed on the device and signed in).

    Displaying Activity History

    From the CRM tab on the contact detail screen, you can select any CRM object (e.g., Opportunity, Lead and Case), then select the "Recent activity" tab.

    Details displayed include a summary of the activities related to the object, such as logged calls, tasks, and events. You can look up the full details of the object in the corresponding CRM app (requires the app to be installed on the device and signed in).

    Adding Activities

    To help you better track your customer interaction during a call, One Talk Side View allows you to add activities for each Opportunity, Lead and Case, which will sync back to your CRM account.

    From the CRM object details screen, you can log a call, add a task, and add an event. Added activities will also display in the "Recent activity" tab of the selected object.

    Desktop Experience

    One Talk Side View desktop apps (Windows and Mac) offer a very similar experience to the mobile apps. The primary difference is that the desktop apps leverage the larger device screen by expanding into a 2 panel mode to provide more information on the screen at one time. All other features are consistent across platforms.

    Best Practices

    Side View works by matching the caller ID of a caller to the information in your contacts, then displaying a summary of the information found (natively in the app) for you to view during your calls. Implementing the following "best practices" will help maximize that contacts are correctly matched to callers and accurate information is displayed in the app.

    1. Utilize "Preferred contact source" – We recommend selecting the preferred contact source that is closest to your primary use case, e.g., how you will use the app.

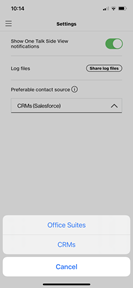
      Preferred contact source is a setting in the app that identifies the primary contact account to first look up information about the caller. Then information from the preferred account (e.g., phone numbers, email addresses, etc.) is used to match the corresponding contact in the secondary account (in the event you have connected both an office suite and CRM account).


      To change the preferred contact source, go to "Settings" and then "Preferred contact source" and select either Office Suites or CRMs.

      If you're primarily using Side View to look up emails and calendar events, we recommend to selecting "Office Suites." Office Suites is the default setting. Alternatively, if you are primarily using Side View to look up CRM information (e.g., leads, opportunities and cases), we recommend selecting "CRMs."
    2. Enter contact (and lead) information consistently – We recommend entering information about your contacts consistently across your office suite and CRM accounts. Therefore, use the same names, phone numbers and email addresses across your accounts when referencing the same person. Consistent contact information will make it easier for the platform to correctly match the contacts across accounts for the same caller.
    3. Make sure contacts are unique wherever possible – We recommend contacts be entered with unique information (e.g., names, phone numbers, email addresses) for each person to avoid two or more people having the exact same contact information. However, depending on how you interact with your contacts, this may not always be possible. Therefore to help maximize the system's accuracy, in the event two or more contacts have the same phone number (e.g., a main business number or department number), ensure the contacts have different email addresses for each person.

      Alternatively, if two or more contacts have the same email address (e.g. a group email inbox), ensure the contacts have different phone numbers for each person. Having unique contact information will make it easier for the platform to correctly match the caller to their contact information.
    4. Assign contacts to CRM opportunities and cases – We recommend when entering an opportunity or case that you link the associated contacts to the record. This is often done by either creating the opportunity or case from the contact record itself or adding the contact to the opportunity or case after it was created through alternative workflows. Opportunities and cases linked only to the account, without the contact assigned to them, may not be found by the system for the caller.