Debido a la inactividad, tu sesión finalizará en aproximadamente 2 minutos. Prolonga tu sesión haciendo clic en "Aceptar" a continuación.

Tu sesión ha terminado debido a inactividad. Vuelve a ingresar para continuar.

Managing Unwanted Spam Calls with Verizon One Talk

Unwanted Spam calls are frustrating. One Talk users can help prevent Spam calls with 4 different options - all are included with One Talk and can be used together to maximize Spam blocking.


Managing Spam Calls with One Talk - 4 Options to Help


IMPORTANT NEXT STEPS:

  • Administrators must have a My Business portal account and End-Users must have a My Verizon portal account as Spam features are managed from the portals.
  • The "One Talk CNAME & Spam Filter" feature must be added to each line to enable Spam Filtering. Two options are available:
    1. Administrators can edit line features in the My Business > One Talk portal and add the "One Talk CNAME & Spam Filter" feature.
    2. Administrators can call Verizon Customer care at 800-922-0204 and request the "One Talk CNAME & Spam Filter" feature to be added to lines.
  • Once the feature has been added to the lines, follow the instructions below.


My Business account for Administrators

One Talk First Steps provides instructions on accessing the One Talk Administrator Portal within your organization's My Business account. You can access and manage the One Talk system, including all features and functions, from the portal.

My Verizon account for End-Users

You must set up a My Verizon account for your One Talk line to manage Spam Filters.

  1. Go to the registration page for One Talk end users.
  2. Enter the 10-digit One Talk number and select Continue. Confirm you are an account member and select Continue.
  3. Select to receive a text/SMS message to authenticate and select Continue. Enter the PIN from the SMS and complete setting up a username and password.
    1. Note: If you have only a desk phone, make sure the desk phone is enabled to receive text/SMS messages (Features > SMS > Enable).
  4. After registration is finished, you’re sent to Manage Call Filters to update your spam settings.


    1. One Talk Spam Filter & Inbound Caller Name ID

    Verizon network-level Spam Filter & Inbound Caller Name ID can be added to One Talk Standard, Plus, Pro, Hunt Group and Call Queue lines at no additional charge and is available for incoming calls to the following One Talk lines:

    • Smartphones (with One Talk Native Dialer)
    • Teléfonos de escritorio
    • Mobile/Desktop Apps
    • Hunt Groups
    • Call Queues

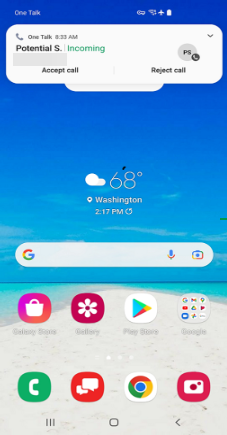
    When the Spam Filtering feature is added to a line, the default setting is "on", and will block calls from phone numbers identified as high-risk by sending them directly to voicemail. All other inbound calls will display "Potential Spam", "Potential Fraud" or "Robo Caller" for phone numbers that have a spam potential other than high-risk. All other inbound numbers not identified with a spam history will have the caller name displayed if available.

    All high-risk rated inbound calls to Hunt Groups and Call Queues will be terminated and not routed to assigned members. The default setting for One Talk Spam Filtering is "on" for Hunt Group and Call Queue lines.

    The One Talk Spam Filter experience is similar to Verizon Call Filter on a regular personal or business mobile phone.


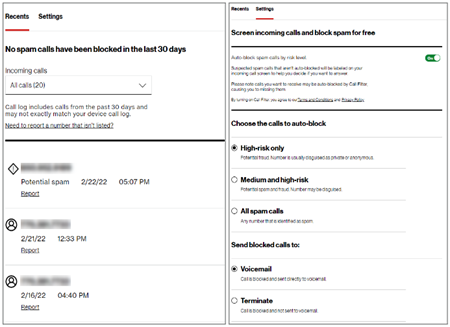
    Managing One Talk Spam Filter

    Smartphone, Desk Phone and Mobile/Desktop App users can make changes to the default settings in My Verizon. Default settings are: Call Filter "ON", auto-block high-risk only, blocked calls sent to voicemail.

    To manage Spam Filters, go to the Call Filter page.

    Users can view call history and report calls as spam or not spam. Inbound Caller Name ID is included as part of One Talk Spam Filter.

    2. Anonymous Call Rejection

    Reject calls with no inbound Caller ID number.

    1. In the One Talk portal, select Manage Features under the "I want to" section.
    2. Select user features, and click Anonymous Call Rejection.
    3. Default setting is "OFF". Either select all lines or specific lines to enable.
    4. Once enabled, calls that have no caller ID number will be blocked.

    3. Selective Call Acceptance & Rejection

    Accept or reject all calls, or calls from specific phone numbers, always or based on predefined conditions.

    1. In the One Talk portal, select Manage Features under the "I want to" section.
    2. Select user features, and click Selective Call Acceptance/Rejection.
    3. Either select the Acceptance tab to only allow incoming call from specific numbers or select the Rejection tab to reject incoming calls from specific numbers.
    4. Select a user line and click the + to begin the setup.
    5. Click Add new to set up the first of 5 potential criteria.
    6. You can either select all numbers or input up to 10 phone numbers per criteria to either accept or reject calls.
    7. Select if you want this criteria to apply always or for a specific schedule.
    8. User line can have up to 5 criteria.

    4. Desk Phone Blocklist Directory

    Reject calls based on phone numbers saved to the blocklist directory on a desk phone.

    1. Users can view a call in their call history, select the number, and select options.
    2. Under options, select add to blocklist.
    3. Users can also go to the directory and select blocklist to manually add or remove numbers from the blocklist directory.
    4. Up to 30 numbers can be saved to the blocklist directory.

    Recursos